welcome

Welcome to the "Time to Sow" blog. Our aim is to provide craft materials with a Christian flavour for adults and children of all ages. Along side the craft products we have an extensive range of puppets in all shapes and sizes to help make teaching the gospel fun. So if you are Stamping, Scrapbooking, Decoupageing, Card Making we have everything you need. We also stock all the accessories like Inks, Embossing powders, tools, card stock, etc. so if you would like your craft to carry a Christian theme then we are the blog for you.


Thursday 16 September 2010

Good evening hope you have had a good week.as you should know we are at sundown Esher launching the new additions to our in house range of words like honey stamps and paper. What follows is a couple of ideas to inspire you with our products hope you enjoy.

Royal Stamp board

The is a set set from the wlh clear collection number wlhc19
first I took a ATC size sampboard and distress the back round use a dream weaver brush code:wwdwbs

I used the broken glass and chipped sapphire distress ink.Nexted i stamped the image and words with staz-on black. Then taking a pointy tool i started scratching away the ink on the kings robes.

Once finished this is how it looked i did it a second time using sandy colours i prefer the blue i must say what do u think?


Beautiful Moment Card
I used this wording on my friends new home card and to honest I love to so much its going on most of my cards it say"live in the moment and make it so beautiful that it will be worth remembering."

first I went on http://www.quakas.com/ and order my duck pond kit packed full of ribbon paper button card stock and much more thank you nessie xx

I made the base card and layered the papers on top but before sticking on the patterned layer I ran the ribbon each side the stuck it and and stamped on top the new wlh bird cage stamps


I then embellished it using sliver peel offs. the off cuts for paper i used as a stop to keep my card up and added the button for fun .

Saturday 11 September 2010

A Bed of roses.


While out and about in town I discovered 2 plain raw a5 folders true I did not know what to do with them but I had to have them as with most things and as with most this they have lived in my craft studio for weeks with me giving them a second look. After a shopping trip in town I was looking at all those lovely school folders and thought I'll treat myself to one when I remembered the 2 I bought weeks before and with a little help from my crafty companion Hamish my dog we set out to jazz them up !!


1. I took the lighter of the 8x8 rose paper and rang double tape along all sidesand stuck it to the top edge of the folder and smooth down at the bottum of the folder there will be a 2 inch gap. which i used a sheet of the darker white roses and stuck it over the gap.


2.I used sticky copper foil and run it along the join of the two papers to give it a nice finish. Repeat this on the back of the folder aswell. I found that the paper did not cover the whole spin of the folder thus I ran a think statin ribbion along the spin to hid the edges.


3. Add on a emblishment mine is a square of eco board with the paper stuck om using tras-fix but more of that on the next blog to you love this folder as much as I do God bless emma.


Would a rose smell so sweet if itwas knowen by a diffent name?

As many of you know one of my grate pleasure's is to enjoy a cream tea in an old fashioned English garden. when our in house design team said there where doing to do more papers for the words like honey range i nag and begged for rose paper and my word they dune me proud.


In the 8 x8 rose pack there is 6 papers all double side 2 of each colour, chocolate,rose and white with a ribbon boared sheet and a topper sheet. below are 3 ways of using the papers.

Tag book

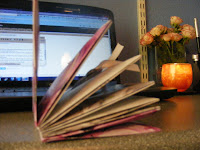
  • Take your sheet of double side paper and fold in half, Open out and fold the over the other half so your paper id divided in to 1/4.

  • Open out flat, On one side fold in the two corners so form a triangle on one half of the paper.


  • Fold the paper along the 1/2 way line so the triangle is resting on the open half and the papers making saw the raw edges are tucked away. Using a hole punch pun 2 hold on the top and bottom sheets to thread ribbon though to tie the book shut. Do this for all six papers in the pack play with the light side as the pocket or the dark.


  • Once all six papers are folded run double sided tape down each side and sick together in to a small stack.

  • Place in tags of your choice i add eyelets and ribbons as a finishing touch.


A perfect way to keep all your promises god has given you. for to do lists. ejoy the 2 next project will be up later today god bless emma.

Wednesday 1 September 2010

twizzle wire bracelet kits

After coming off street pastor duty at 5 am I can never go straight to sleep so I end up looking online to see what new products our suppliers have. So when i came cross these twizzle wire bracelet kits my mind was spinning with ideas . I awoke Wednesday morning to the postman to a huge box full with wire and beads .So armed with a cup of tea and a chocolate orange myself and mum opened the box. After we stopped squabbling over the kits and
amazing colours I set my self to play and here are the results.

Each kit contains
  • twizzle wire
  • memory wire
  • beads
you will also need
  • wire cutters
  • round nosed pliers
step 1
make a loop at one end of the memory wire. This will stop the beads falling off the wire.


step 2
cut the twizzle wire to your chosen .IN the Misty Morning blue kit I used 2-3cm lengths,the Scrumptious Sliver kit i used 8cm lenghts.


step 3
Start by threading on a bead on to the memory wire then a piece of twizzle wire and continue alternating the beads and twizzle wire thou the whole lenght of the memory wire.


step 4
once your happy with your design finish of with a bead then using the pliers make a small loop at the end so the beads will not fall of this end either.


and your bracelet is complete.