welcome

Welcome to the "Time to Sow" blog. Our aim is to provide craft materials with a Christian flavour for adults and children of all ages. Along side the craft products we have an extensive range of puppets in all shapes and sizes to help make teaching the gospel fun. So if you are Stamping, Scrapbooking, Decoupageing, Card Making we have everything you need. We also stock all the accessories like Inks, Embossing powders, tools, card stock, etc. so if you would like your craft to carry a Christian theme then we are the blog for you.


Friday, 6 January 2012

Love: spring wedding

Hello again,
         Today card was an idea I thought of for wedding stationary. I have chosen a range of soft pastel colours perfect for spring wedding.
materials use in today's card where:

  • a range of coloured pro makers.
  • matching coloured papers
  • 3-d squares
  • Black Memento Code: PIMIP608 Price: £3.99
  • Decoupage Scissors Teflon Coated Code: EMSE1012t  Price £4.10
  • Hands and Window Code: WLHC038 Price: £8.50


 first I stamped up the window image twice using the memento black in pad ( the only ink pad that can be used with pro markers) the first I coloured the glass sections using the pro makers leaving the rest of the image uncoloured.
      Next I took the second image and just coloured the out frame in a stone Gray colour.Once coloured used a shape craft knife and cut out the centre area of the image.Cutting the 3-D  squares  to the size and shape of the window frame I layered the frame on the top of my first image to give the 3d effect.
     Cutting out the image I layered it careful to one side  to match the paper I be using on my base card and started to work on my base card stock.
     I cut my 3 coloured sheets to the lenght of the base card 5x5 and then trimmed the papers to different withs and finish of with a length of white to finish  and tie all the card together.
    Then using  the form squares I added finish 3-D window and left space to the  right of my wording.

Hope you enjoyed this posting andIwill see you next time for some more ideas and musings
 God bless and I trust you will have a fabulous week.


Wednesday, 4 January 2012

This months theam

Well hello and welcome to a new year.
 This months blog Theme is Love. Now the ible very clearly tells us what love is in 1 Corinthians 13

 1.If I speak in the tongues of men and of angels, but have not love, I am only a resounding gong or a clanging cymbal.
2If I have the gift of prophecy and can fathom all mysteries and all knowledge, and if I have a faith that can move mountains, but have not love, I am nothing.
 3If I give all I possess to the poor and surrender my body to the flames,b but have not love, I gain nothing.

4Love is patient, love is kind. It does not envy, it does not boast, it is not proud.
 5It is not rude, it is not self-seeking, it is not easily angered, it keeps no record of wrongs.
6Love does not delight in evil but rejoices with the truth.
7It always protects, always trusts, always hopes, always perseveres.
8Love never fails. But where there are prophecies, they will cease; where there are tongues, they will be stilled; where there is knowledge, it will pass away.
9For we know in part and we prophesy in part,
10but when perfection comes, the imperfect disappears.
 11When I was a child, I talked like a child, I thought like a child, I reasoned like a child. When I became a man, I put childish ways behind me.
12Now we see but a poor reflection as in a mirror; then we shall see face to face. Now I know in part; then I shall know fully, even as I am fully known.
13And now these three remain: faith, hope and love. But the greatest of these is love.

I am sure many of you know this verse well if not in full then  in part.I personal love this verse it has taught me some hard lessons in my life but also given me some great comfort.
Today I used the most famous symbol of Love, a simple heart.

I created this heart by drawing round a heart template on to  black  and frosted strink plastic,then taking my black heart I used a white gel pen and ran a stitched design round the edge of the heart then placed a hole at the top for my finding's.
 taking the heart gun I applied heat to the plastic and strink the hearts to there smaller size. Now I add the findings to complete my set.


For a nice alternative I took one of our in house words like honey  clear stamps and stamped it up using black memento ink on the ruff side of the plastic. Once again  I took a hole punch and place in two holes to take the finding's required to finish my second set of earring's.


Tuesday, 20 December 2011

Hi everyone, hope this finds you well and not to cold!
 Its the end of the year and and for me a lot has happen both good and bad, so I am looking to the new year and new beginnings.
We are currently stock taking and reviewing all our stock when I came across the stamp celebrate new beginnings which is perfect for a new years card.

Celebrate..

Code: BW6187N
Celebrate New Beginnings
Size 7 x 7 cm
Price: £7.99 (Estimated: €9.35 $11.99usd)


I also used a clear Woodward stamp which I coloured used promarkers.

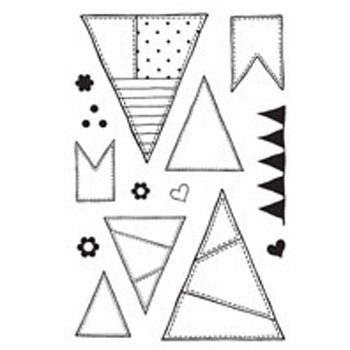
BUNTING BUILDER

Code: WWFRC208
Clear set ready to mount on an acrylic block, set size approx. 15cm x 10cm
Price: £10.25


 Below is the finish card .I chose the soft yellow and blue PROMARKERS as I found the colours fresh and new and the buttons matched perfectly and just finished off the card
.Hope you like it and that you will have a blessed week Emma.


Friday, 16 December 2011

pink christening


Well hello again,
I thought I would share with you a very simple stylish card that can be made both in blue and pink.
The materials  I used where:
 jolee stickers efco 1191032
 and Peel Offs in
 Pink xl46820
 and Frosted Edges ccxl177u

Is it just me or is this a lovely shade of pink?
 I found it in my craft paper stash. I personal love using this triple aperture card as it a fab way of using all your off cuts and small embellishments.


CHRISTMAS BLESSINGS

A snowy hello to you. We finally had snow in Bedfordshire today not much, but some.
    I wanted to share with you a card made with our in house range Words like Honey stamps.
This card was made using the:

 Clear Stamp set Christmas images Code: WLHC022


Below is the  finished card. As you can see it was layered up on to A
  blue card tones with frosted peel offs to complement the blue glitter paper. The image was coloured using pro markers {every ones must have}.
 A very eye catching  card I am sure you would agree


Monday, 12 December 2011

On The 12th Day Of Christmas The Sale Ends

Good Morning
        Well here we are the 12th day of Christmas the last day of the sale and today we bring you a collection of scrapbook papers, We hope that you all manged to get soming in the sale you wanted. Don't forget you can order up to:

 Wednesday 14 December Standard Parcels

Saturday 17 December Second Class and Recorded Signed For

Tuesday 20 December First Class and Recorded Signed For


 Keep an eye on your emails and facebook for new products and more offers next year.
May you all have a peaceful and blessed christmas from Tim and Mandy.

Thursday, 1 December 2011

Day 2 of 12 days of christmas

 Hello again,
         Well its here again the first of December! and we are moving in to day 2 of our 12 days of Christmas sale.
          Today we bring you Dreamweaver stencil's which can be used on a light box or sizzix/cuttle bug Die-cutting Machine with a rubber mat at from www.thecraftbug.co.uk/ plus there fab for all types dies including Tim holtz
For tonight card I've used:


 Bundled Sage distress ink

Code: PITIM27102


Wrought Iron Embossing Plate
Code: WWDWLG684
set of three brushes
Code: WWDWBS
A set of three brushes designed for applying colour after embossing
www.timetosow.com


 I embossed my card with the dream Weaver template and light box, once the image was embossed I flip over the card and relined the template with the raised image .I used a dream weaver brush and applied the sage colour ink using the stencil as a mask.

  • Once the image is coloured crisply I moved on to the  back card stock and soften the white with a soft colour wash round the edges.Then taken a lager back round patterned stamp in inked it up in the same colour distress ink and stamped in on to opposite corners

  • I cut and mounted the embossed image on to gold mirror card stock and then added this to my stamp card stock.